Uploading Grades
Upload Grades From a Spreadsheet
See also: Upload Grades from Canvas Gradebook
Faculty can upload their grades from a spreadsheet into their DuckWeb Grade Rosters, thus eliminating the hand-keying of student grades one at a time. The process involves three basic steps: 1) preparing an upload spreadsheet in a tab-delimited text file format (".txt"); 2) logging into DuckWeb to upload grades from the spreadsheet to the online grade roster; then 3) checking and submitting the grade roster.
Uploads are only available for the original grade roster. It is not possible to upload grade changes after a roster has been submitted.
Step-By-Step
First: Prepare the Excel file or other spreadsheet file for uploading
Step 1: Note which column contains the student ID numbers.
Step 2: Note which column contains the grades. (Plus/minus grades need to be in the same column as the grade itself.)
Hint: If either of these data items are in column "Z" (26) or to the right of column Z, you'll need to move the columns so that these two items are within the first 25 columns of your spreadsheet. Don't be concerned about rows of info at the top; this process will ignore extraneous text in these rows.
Step 3: Save the spreadsheet as a tab-delimited text file (".txt") and note the file location.
Hint: In Excel, select "File" then "Save As" from the menu bar. Enter a file name and in the "Save as Type" field, select "Text (Tab delimited) (*.txt)".
Next: Log into DuckWeb as usual, then upload the file into your grade roster
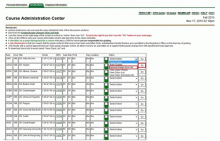
Step 4: After logging into DuckWeb click on Faculty Menu, then click on "Course Administration Center."
Step 5: Select a Term from the dropdown list and click on submit.
Step 6: Find the class you want to upload grades for, and use the drop-down box in the column labels "Action" to select "Upload Grades from File", then click on the "GO" button to the right of the action.
Step 7: Enter the path/filename of your tab-delimited text file (".txt"), or browse for the file name and click "Open."
Step 8: Set file type to "Text (Tab delimited) (*.txt)".
Step 9: Enter the column number that contains the student ID numbers (you noted this in step #1 above).
Step 10: Enter the column number that contains the grades (you noted this in step #1 above).
Step 11: Click on "Process file" to upload the file and display an error list or click on "Test Upload" to upload the file and receive a complete listing of data uploaded with errors noted.
Important: Print the results page for reference. Problems will be reported back to you. Note that if you enter a letter grade when a P/NP is required, the upload process will convert the grade for you and tell you on the report.
Hint:You can't get back to this page so be sure to print the page (or at least review it) before proceeding to the next step.
Next: Check and Submit your Grade Roster
Step 12: Click on "View Grade Roster."
Step 13: Use your printout (step 2.h above) to resolve errors as usual (use the "Find Missing Grades" button; use the next page or alpha bar to navigate to records you might need to check or correct, etc.).
Step 14: At this point you can save your work and exit the grade roster or, if you are ready to submit the roster, click on "Submit Roster", and go through the usual routine (check the box and click on "Submit Final Roster"). If you decide to "save" the roster without submitting, be sure to log into DuckWeb before the grading deadline and submit the roster.
Upload Grades from Canvas Gradebook
See also: Upload Grades From a Spreadsheet
Faculty can also upload their grades from Canvas into DuckWeb Grade Rosters, thus eliminating the hand-keying of student grades one at a time. This process involves four basic steps: 1) enabling a grade scheme in Canvas 2) downloading the grades from Canvas to a CSV text file; 3) logging into DuckWeb to upload grades from the .csv file into the online grade roster; and then 4) checking and submitting the grade roster.
Enabling a Grading Scheme
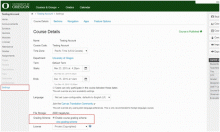
Step 1: Log into Canvas and go to your course "Settings". Next, check the box to "Enable Course Grading Scheme". This will ensure that letter grades are generated in the Canvas gradebook in preparation for exportation to DuckWeb.
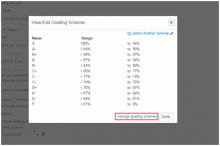
Step 2: Select "View Grading Scheme" to check that the defaulted grading scheme matches with your course’s grading scheme. If you need to make changes, please proceed to Step 3.
Step 3: Making changes to the course grading scheme. If the defaulted Grading Scheme is not the one you want, choose "manage grading schemes".
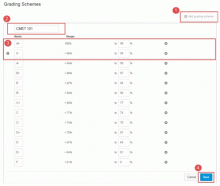
First, choose "Add Grading Scheme". Note: This will NOT create a blank grading scheme, it will let you edit off of the defaulted scheme.
Second, give your scheme a name and then proceed to the third step of adding and editing components of the grading scheme. Finally, make sure to press save.
In this example, I wanted to add an A+ range, so I clicked on the "+" button to the left and inputted the text & percentage range desired.
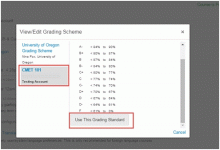
Step 4: Once you have saved the new grading scheme, go back to the course "Settings" and click on "View Grading Scheme". Now, you will choose "Select Another Scheme".
Select the scheme, scroll to the bottom and choose "Use This Grading Standard". Finally, you will press "Done".
Downloading Grades from Canvas
Step 5: Log into Canvas and go to Grades. Next, we will export the grade book as a CSV text file.
Step 6: Click on "Export", and then choose "Current".
Note: Users with the GTF role in Canvas are unable to export the full grade book needed for uploading grades.
Step 7: Next, the CSV file will be downloaded to your computer.
![]()
Step 8: Go to downloads and open this file. To upload grades, DuckWeb needs to recognize the student ID number (95..) and the total grade column (letter grade). Therefore, you will need to make a note of which column in the excel file has the student ID numbers and the total column. After, close the file.
Example: SIS User ID column C; Total = column X
Logging into DuckWeb and Uploading Grades
Step 9: Next, log into DuckWeb, click on Faculty Menu and then click on "Course Administration Center" and select the correct term.
Step 10: Find the class you want to grade, and use the drop-down box in the column labels "Action" to select "Upload Grades from File", then click on the "GO" button to the right of the action.
Step 11: Enter the path/filename of the exported gradebook file, or browse for the file name and click "Open." Set file type to "Comma Delimited."
Step 12: Select the column for the student ID numbers that you made note of earlier. (Ex: Column C)
Step 13: Enter the column (A, B, C) that contains the total letter grades. (Ex: Column X)
Step 14: Click on "Process file" to upload the file and display an error list.
Important: Print this results page for reference. Problems will be reported back to you. Note that if you enter a letter grade when a P/NP is required, the upload process will convert the grade for you and tell you on the report. This conversion is automatic, so you will not need to do anything personally.
Hint: You can't get back to this page, so print this page (or at least review it) before going on to the next step.
Checking and Submitting the Roster
Step 15: Click on "View Grade Roster."
Step 16: Use the printout (see above) to resolve errors as usual (use the "Find Missing Grades" button; use the next page or alpha bar to navigate to records you might need to correct, etc.).
Step 17: At this point you can save the work and exit the grade roster or, if you are ready to submit the roster, click on "Submit Roster", and go through the usual routine (check the box and click on "Submit Final Roster"). If you decide to "save" the roster without submitting, be sure to log into DuckWeb before the grading deadline and submit the roster.
