DuckWeb Has Changed
Join a member of the registration team to walk through the updates and learn how to make registration changes.
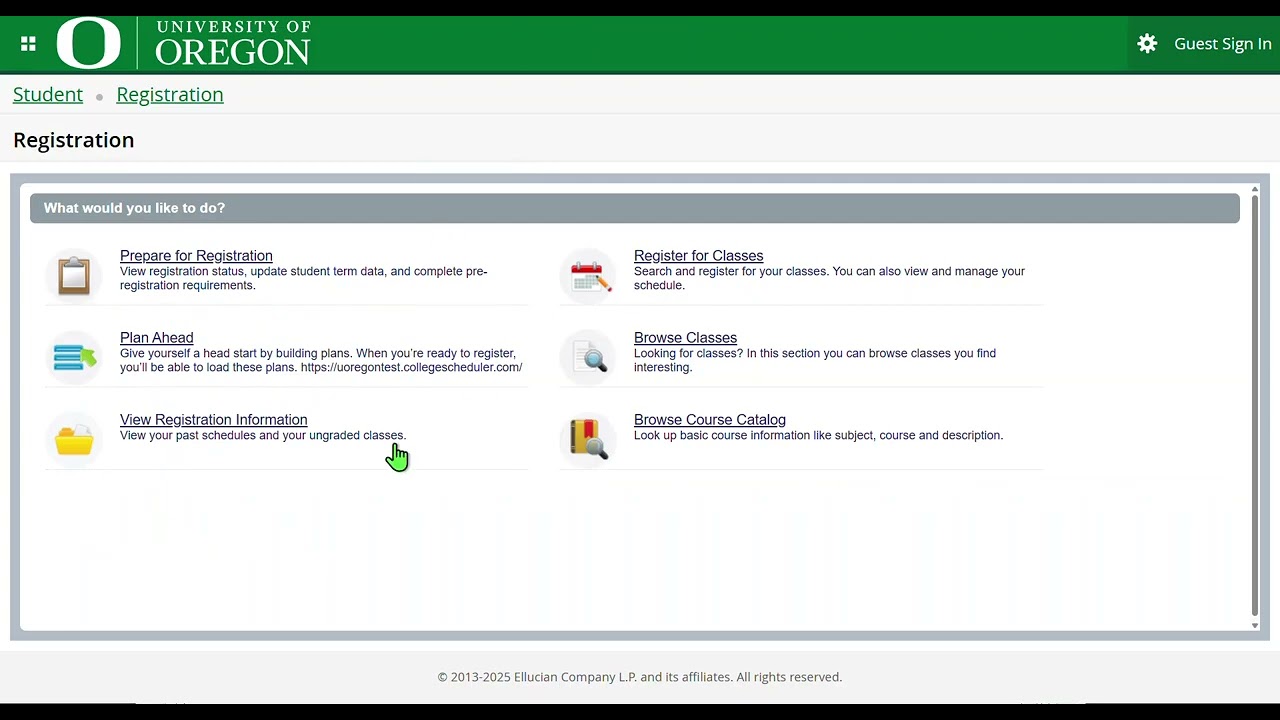
What You Need
The first time you register for classes on DuckWeb you will need your:
- Student ID Number (UO ID) that starts with 95
- Personal Access Code (PAC) which was sent from Admissions
- First-time UO undergraduates must meet with an advisor before they can register for classes
Undergraduate Students
Students who have registered within the last year and have not completed their degree can register when initial registration opens.
Students who were not enrolled in the last year must complete a reenrollment form.
Graduate Students
Graduate Students who have taken time off will need to contact the Division of Graduate Studies regarding future enrollment.
The initial registration schedule is determined by level (graduate or undergraduate), number of total completed credits, and the first letter(s) of the student’s last name.
After your initial registration, you can adjust your schedule anytime. There are certain deadlines after which you cannot adjust variable credits, change the grade option, or add/drop/withdraw. Review the academic calendar for important dates and deadlines.
How to Register for Classes in DuckWeb
- Log in to DuckWeb
- Click on the “Student Menu” tab
- Click on “Registration Menu”
- Select “Registration Dashboard”
- Select “Registration and Changes”
- Enter your username and password, then validate yourself via two-factor authentication with DUO. If you are prompted to select a role, select “Student.”
- Under the “Select a Term” header, in “Terms Open for Registration,” use the drop-down to select the term and click “Continue”
- You have options to register for classes:
- Register using a pre-built plan using the “Plans” tab
- Search for classes and register using the “Find Classes” tab
- Specify the CRN you want using the “Enter CRNs” tab
Register using a pre-built plan
You can use your pre-built plan(s) to register.
- Under the “Register for Classes” heading, select the “Plans” tab
- Your preferred plan will be listed. You have options to add the plans or courses:
- Use the “+Add All” button to add all the courses from your preferred pre-built plan
- Use the “+Add” button for courses as you select them to build your registration
- Expand another pre-built plan; use either the “+Add All” for all courses or the “+Add” to select courses
- The courses are added to your “Summary” panel and the “Schedule” panel (“Schedule” tab and “Schedule Details” tab as well) in a “Pending” status
- Use the “Submit” button to submit the courses for registration
- Courses you are registered for will update to a status of “Registered”
- Courses that were not able to be added will update with a status message that shares information about why the course could not be added. Review the message and either select another course or take action to resolve the error.
Register by Searching for Classes
Within “Register for Classes” you can use the “Find Classes” tab to enter your search criteria. There are basic and advanced search options to search and select courses.
- Basic search criteria include:
- Subject—e.g., Writing, Business Administration
- Course Number—e.g., 101, 102, 103
- Use the percent sign (%) at the end of the course
- “1%” would be all 100-level courses and “2%” would be all 200-level
- For Core Education courses, “121%” will find WR 121Z
- For Honors College courses, “225%” will find CH 225H
- Use the percent sign (%) at the end of the course
- Subject and Course Number—e.g., BA 101Z, WR 121Z, BI 150
- Level—e.g., Undergraduate, Graduate, Law
- Core Education, Low/No Cost Materials
- Checkbox for results to include “Open Sections Only”
- Campus—e.g., Eugene, Portland, Online, SW Oregon Coast (Charleston)
- Select “Advanced Search” to have all of the criteria in the basic search, as well as:
- Instructor: We recommend you use the instructor’s last name (e.g., Hollander, Wakefield)
- Title: Search for the name of the class (e.g., Differential Calculus)
- If you are unsure of the entire title, use the percent sign (%) to search for a title that includes the word you know (e.g., %calculus%)
- Credit Hour Range—e.g., “3–3.99” to look for a course that is worth 3 credits
- Meeting Days: Use the checkbox for the days you want classes to be included on
- Start Time: Use the drop-down menus to note the earliest hour, minute, and AM/PM for the class to start
- Note: Required linked CRNs (lecture, +Dis, +Lab, +Tutorial) may be outside your listed parameter
- End Time: Use the drop-down menus to note latest hour, minute, and AM/PM that the class will end
- Note: Required linked CRNs (e.g., lecture, +Dis, +Lab, +Tutorial) may be outside your listed parameter
- Enter the criteria you want to search for (e.g., Subject, Course Number)
- In the search results, review at least the title, meeting times, and campus. It is also suggested that you review the seats (especially if you did not only search for open classes), reserved seats information, and instructional method (in-person vs. asynchronous online, vs. synchronous online, etc.). Use the “Add” button to select your course of choice
- The course(s) are now included in the “Summary” panel with a status of “Pending” status
- To register for the course(s), use the “Submit” button
- The status will change to “Registered” in the “Summary” and “Schedule Details” areas on the panels for courses that were successfully registered.
- If the course has a set meeting time, the course will appear in the “Schedule” panel
- If the course does not have a set meeting time, it will only appear in the “Summary” and the “Schedule Details” panels
Register with a CRN
If you know the CRN or an instructor or department shared a specific CRN with you, use the “Enter CRNs” tab as a quick way to find, add, and register for the course.
- Enter the five-digit CRN in the CRN text box
- If it is a two-part course or you have another specific CRN to add, click “+Add Another CRN”
- The course(s) will load in both of the other panels—the “Summary” panel and the “Schedule” panel in the “Schedule Details” (and “Schedule” tab if it has a set meeting time) with a “Pending” status
- To register for the course(s), use the “Submit” button
- The status will change to “Registered” in the “Summary” and “Schedule Details” areas on the panels for courses that were successfully registered
- If the course has a set meeting time, the course will appear in the “Schedule” panel
- If the course does not have a set meeting time, it will only appear in the “Summary” and “Schedule Details” panels
Tips
Linked Sections: Use the “View Linked” button to see the linked sections (e.g., Lecture + Lab) and the “+Add All” button in the linked sections results to ensure you add both required CRNs.
Panel Views: After adding a course, toggle through the panels.
- Use the “Panels” button
- Use either Ctrl+Alt+V or Ctrl+Alt+C
- Place your cursor over a panel border and drag it to a size you want
Conditional Add and Drop: “If a seat is available in course 1, then drop me from course 2.” To utilize this option, select a course and use the “Add” button so that it has a status of “Pending” in the “Summary” panel. Before doing anything else, for the course you want to drop, select “Drop Course” from the “Action” drop-down menu for the course. Use the checkbox for “Conditional Add and Drop.” Finally, use the “Submit” button to process the “if/then” action.
Class Details: To see additional information about a course, click on the link in the course title. This displays the “Class Details” card that includes the following items:
- Class Details includes information on:
- Campus—e.g., Eugene, Portland
- Schedule Type—e.g., Lecture, Discussion, Lab, Tutorial
- Instructional Method—e.g., In-Person, Asynchronous Online, Synchronous Online
- Subject—e.g., Writing, Chemistry, Spanish, etc.
- Course Number— e.g., 101, 102, 103
- Title: The title of the course
- Credit Hours: Number of credits for the course
- Grade Mode: Will note if it is a specific grade mode
- Bookstore Links: Will link to Duck Store for class materials
- Course Description: Short description of the course
- Course Information includes:
- Learning objectives
- Expanded course description
- Requisites for the course (commonly known as “prerequisites”)
- Attributes: Notes specific core education area(s), codes for specific area/major/minor requirements, etc.
- Restrictions: Most common is the restriction of graduate level courses to graduate students
- Instructor/Meeting Times: Lists the Instructor(s) of the course and the meeting day(s) and time(s)
- Enrollment/Waitlists: Lists actual, maximum, and available numbers for both enrollment and waitlists
- Corequisites: List of course(s) that are required to be taken with the course
- Prerequisites: List of course(s) that are required to be completed prior to taking the course. Note that some are “and” (multiple courses required) and some are “or” (one of a specific list is required). Not exclusive; course can require a specific course and a course out of a list of courses.
- Cross-Listed Courses: Some courses are cross-listed between multiple subjects
- Linked Sections: Applies when a course has a Lecture + (Discussion, Laboratory, or Tutorial)
- Course Fees: Lists the description and amount of the associated course fees; most course fees are separate and in addition to tuition and mandatory fees. See Course Fees and Other Fees and Fines.
- Catalog: Department offering the course is listed for students seeking approvals or overrides to register for the course
Change Grade Mode: In “Register for Classes” use the “Schedule and Options” tab to view the “Grade Mode” for a course. If the “Grade Mode” listed is hyperlinked (underlined) you have the option to change the grade mode by clicking the link and using the drop-down menu to select another grade mode.
Change Credit Hours: In “Register for Classes” use the “Schedule and Options” tab to view the “Hours” information. If the “Hours” listed is hyperlinked (underlined) you have the option to increase or decrease the hours by clicking the link and using the drop-down menu to select a different number of hours. This is typical for research, thesis, etc.